Showing posts with label baking. Show all posts

Tuesday, 18 November 2014

Baking Oreo Cupcakes

A couple of weeks back, I baked these super easy and delicious Oreo cupcakes and took some pictures to share the recipe with you all, so here they are, hope you enjoy!

YOU WILL NEED:
* 1 cup of flour
* 1 cup of sugar
* 3 teaspoons of baking powder
* 3 eggs
* Half a cup of oil
* Half a cup of water
* 3 packets of Oreos
*  2 cups icing sugar (confectioners sugar)
* 125g butter
* Vanilla essence
* Pinch of salt

Preheat the oven to 180 degrees Celcius/ 350 degrees Farenheit. 
So first thing to do is to sieve the flour, ordinary sugar and baking powder into a mixing bowl. 


Now add the oil, water and 1 teaspoon of vanilla essence. 


Next, you need to separate all three eggs. Put the whites into a fairy large bowl as we are going to whisk them just now. Toss the yolks into your flour-sugar-oil-water mixture and mix it all up with a whisk/spoon until the yolks are properly blended in. 


The egg whites need to be beaten now, and I highly suggest you use an electric whisk if you can! Beat them on high until they are stiff enough that they won't fall out the bowl if you tipped it upside down. When they are stiff, add another teaspoon of vanilla essence and mix that in. 


Fold the whites into the batter now, do so with a spatula and make sure you don't stir it any more than it needs. 
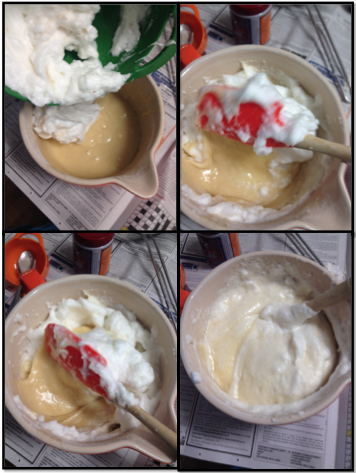


Take 3/4 of a packet of Oreos and use a food processor to make them into tiny little crumbs. You could rather do this by hand by popping them in a sandwich bag and hitting them with a rolling pin, but either way make sure they are very fine. Add the Oreo crumbs to the batter. 


They are almost ready to go into the oven. But first, put cupcake holders into your cupcake tins and at the bottom of each holder, place down a whole Oreo for a little treat at the bottom. 


Now pour the batter into the holders and put them in the oven for 15-25 minutes, it completely depends on your oven, but I'd start checking from about 15 minutes. To tell if they're done, just stick a knife or toothpick into them and they are done if it comes out clean (without any batter on it). 


When they are done, let them cool completely. Meanwhile, you can make the icing. To make this, let the butter soften (if you do this by putting it in the microwave, make sure it doesn't melt, just softens) and then combine it with the icing sugar (sifted), 1 teaspoon of vanilla essence and 3/4 of a pack of ground up Oreos again. If the Oreos make it too thick, just add a little cold water. And if it is too runny, add some more icing sugar. 

Now you can ice the cupcakes and for a little last decoration, add half an Oreo on top. 


And that's it! I hope you enjoy!
(This recipe was "inspired" by Tanya Burr's video on them, but the actual icing and cupcake recipes are mine :) ) 


Happy baking!


Saturday, 16 August 2014

Delicious Gluten-Free Brownies

For about the past 5 months or so I've been on a gluten-free diet, not because I am resistant or anything other than I thought I'd just give it a try. I realised that it was so much easier than I imagined, especially with so many shops and restaurants becoming on board with it, and so I have kept it up, because in general my body just feels a lot "happier" now. I often felt quite bloated after large potions of wheat (gluten), and so in general, I just really feel healthier on this, and I think it's helped reduce my hayfever too weirdly enough! 

Okay, so that's why I made these gluten-free brownies. Let me start with a disclaimer: when I read of any form of baked good that is something-free (whether it be gluten, dairy, sugar, anything), I am hesitant. The idea of "healthy brownies" just contradicts the point in my mind, so let me just say, these are not healthy brownies, they are exactly normal except instead of normal wheat (gluten) flour, this uses corn flour! But anyway, I have been hooked on these because 1) I can eat them as much as I want (well not really, but you know what I mean) because they stick in my gluten-free eating plan and 2) they are actually like one of the best brownie recipes I've found!


So here's what you'll need:

  • 2 eggs
  • 3/4 cup of sugar
  • 2 Tablespoons cocoa
  • 3 Tablespoons cornflour (maizena)
  • 1 teaspoon vanilla essence
  • 130g of dark (or milk) chocolate
  • 100g white chocolate
  • Pinch of salt
  • 6 tablespoons of butter
Start by melting the butter and sugar together in a pot, I tend to use a double boiler so when the chocolate is added, it doesn't curdle.


Once the sugar is completely dissolved, add in the dark chocolate (chopped roughly) and stir on low heat until it melts. 


That mixture can be set aside to cool for a little, while you chop up the white chocolate into rough, semi-large pieces. 


So put aside the chocolate for a little while, and go back to the mixture in the pot. Check that it is not boiling hot, it can be luke-warm or so. Add in the 2 eggs and whisk them in until combined.


(note, you could transfer the mixture into a mixing bowl before this step, but I chose to just make the batter in the pot I had used)

So now, sieve in the cornflour, followed by the cocoa and combine thoroughly with a whisk (side note: corn flour is our gluten-free substitute instead of ordinary flour).


Dip your finger in the batter and check that it's barely warm at all now. If it is, let it cool as bit first. Once cool-ish, add the white chocolate chunks and mix in.


Because the mixture is quite wet (due to little dry ingredients), make sure you grease your baking tin very thoroughly! And then pop them in the oven for about 20 mins at 180 degrees Celsius (I think that's 350F), but keep an eye on them, depending on your oven's strength. 


Annd that's literally it! So quick, so easy and so delicious, promise! 
I hope you enjoy this type of baking post, give these ones a try for sure!

This picture doesn't quite do them justice, think we ate them all before I got the chance to take a proper one!


Sunday, 29 June 2014

Snickerdoodle Sandwich Cookies


The holidays bring on endless baking opportunities, and I kind of took it a bit overboard considering I literally hadn't baked in about 4 months! So among some of the thing I baked were these Snickerdoodle cookies, which were so delicious and easy that I had to share them with you (side note: I'm do realise how long it's been since I last posted! I did a bit of a blog revamp and changed the look a bit- but haven't posted for ages- so apologies haha)

Okay back to baking- so yeah, I didn't know this before (I think it's an American thing??), but snickerdoodles are pretty much like cinnamon biscuits/cookies. I am such a cinnamon fan, so I had to make these- and I sandwiched them with vanilla buttercream in the middle because it makes them even more delicious and without it, I found them a bit too crunchy and hard, the icing softens them a little. 

So yeah, here they are- I take no credit for the recipe- I got it off Fine Cooking's website- but here are my renditions.

INGREDIENTS:
You will need:

For cookies: 

         1 tsp. Bicarb (baking soda)
         Pinch table salt
         2 tsp. cream of tartar
         2-2/3 cups ordinary flour
         1 cup unsalted butter, softened at room temperature
         2 cups sugar
         2 large eggs
         3 Tbs. ground cinnamon
       For butter cream:
      1 and 1/2 cups icing sugar
      125g softened butter
      2 teaspoons vanilla essence
      1 vanilla pod


WHAT TO DO: 

Start by setting the oven to 180 degrees Celsius/ 350 Fahrenheit

In a large mixing bowl, put in your softened (not melted) butter and 1 and 1/2 cups of the sugar. Beat them on high with an electric whisk until the mixture looks quite bitty. 


Now add the 2 eggs and whisk again on medium speed until the batter is creamy and smooth looking. 


Next, we mix the dry ingredients. So into a separate bowl/mixing jug type thing sieve in the flour, bicarb, cream of tartar, salt and 1T of the cinnamon. 


To make the cookie dough, you must now gradually add in the flour mixture, a couple of tablespoons at a time, into the sugar/butter/egg mixture. So start by adding a little and then using the electric beater to combine it.


Continue doing this, gradually adding the flour mix, and a thick dough will start to form. 


Once pretty much all the flour has been added, you'll find that the dough is too thick to continue using the beater. So just switch to using your hands to combine the last of the flour and form a ball of your cookie dough. 


Now, in a separate, small bowl, mix the remaining 2T of the cinnamon and the the remaining 1/2 cup of sugar- to basically form cinnamon sugar (the measurements aren't important here, just make cinnamon sugar like you would for pancakes and you can add more or less cinnamon depending on what you like). Form little round balls of cookie dough and dunk them in the cinnamon sugar, ensuring they are very thoroughly covered in it. 


Continue this until all the dough is used. Place your cookies on a greased (or use a Silpad) baking tray. No need to press down the biscuits with a fork- they flatten themselves. Don't make the balls too big cause they grow a lot. Also, don't put them too close to each other on the tray. 


Cook them for 12-20 mins (depending on your oven), but start checking from 12 mins because they turn and burn quite suddenly. They will be golden but not dark dark yet when they are done. 


To make the vanilla butter cream to sandwich them, sift the icing sugar into a mixing bowl and cream in 125g of softened butter. Add the vanilla essence and the seeds from a vanilla pod too (optional). Now sandwich the cookies. Take 2 evenly sized biscuits and sandwich them using the icing so that they look like this:


And tahdah, that's it! They are so easy, and super good, so I hope your enjoy them! 


Saturday, 11 January 2014

More Belated Christmas Cookies

So, on the day that I made my Christmas Gingerbread Cookies I also made a huuuge batch of my absolute favourite type of cookies.

I made these delicious peanut and chocolate chip biscuits which were really so easy. It's basically a very basic recipe for butter cookies with a huge amount of chocolate and peanuts added in, but I have finally found the perfect basis (like the butter biscuit recipe) to make these. I cut them into christmas-sy shapes but they are not really specific to christmas at all, so you could just roll them into little balls and squish them lightly with a fork or use any other types of cookie-cutters.

1) Start by sifting all the dry ingredients into a large mixing bowl. These will include: 560ml (2 and a quarter cups) of cake flour and 1 teaspoon of bicarbonate of soda (baking soda).


2) In a separate mixing bowl, cream together 155g of very soft 
 butter, 175ml of muscovado (soft brown) sugar and 60ml of normal white sugar with a spatula. Whisk in 2 eggs and 1 teaspoon of vanilla essence.


3) Now add the wet ingredients (the egg, butter and sugar mixture) to the dry ingredients. Blend until a relatively thick dough is formed. 


4) Chop up very roughly (so in quite big chunks) 250g of milk chocolate and 140g of white chocolate. Add the roughly chopped chocolate into the dough as well as 150g of peanuts. Use your hands to mix them into the dough, to form a thick, chunky ball of dough. The chocolate and peanuts will look like they're far exceeding the amount of dough, but use your discretion, the mixture is meant to be very chunky. 


5) Now roll out the dough over a lightly floured surface. Note that this will seem pretty hard to roll out because of all the nuts and chocolate, but it will work. And cut them into the shapes you want with cookie-cutters. 


6) Place your cookies onto a greased baking tray, or a Silpat over a baking tray and cook them at 180 degrees Celsius (350F) for 8-10 mins. They burn easily so make sure to watch them and take them out when they're quite firm and golden. Let them cool for a few minutes and there you go. Delicious :) 


I hope you enjoy my chocolate chip and peanut cookies!